How To: Set up a 2-level factorial design using Design-Expert software
Explore the power of Design of Experiments (DoE) with this quick guide to setting up your first design!
Written by Dr. Sue Connor, Consultant.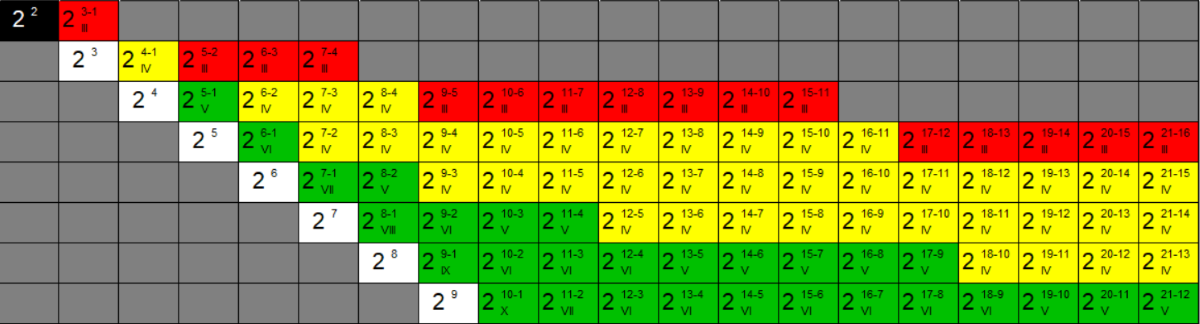
Screening designs are widely used to identify the critical few factors amongst the trivial many. These studies typically use a 2-level factorial design, to strike the ideal balance between efficiency and effectiveness.
In this How To example, we're going to walk you through the process of setting up a 2-level full factorial design using Design-Expert, a powerful DoE software package from Stat-Ease (and everything covered in this article is also applicable to Stat-Ease 360, a supercharged version of DX!). We hope this basic step-by-step guide will help those of you starting out in the world of experimental design, whilst also acting as a useful tip sheet for attendees on our various DoE training courses.
The first step in any DoE analysis should be to carefully consider which factors and settings need to be investigated for their effect on the process. You must also consider which responses will be best for monitoring performance, and think about how much resource is available for your study. At this stage, you are ready to start creating your experimental design.
We're going to illustrate the creation of the experimental plan using a simple chemical synthesis case study. The aim of this is to measure the improvement in yield of a product, in response to changing three factors; Concentration of the starting materials, Temperature and Time. We will set up a 2-level full factorial design (usually denoted 2k, where k is the number of factors) - this will allow us to estimate the effect of our three factors, along with all of their interactions.
To set up this design, launch Design-Expert. Four options are presented (see figure 1); New Design, Open Design, Import Data and the Design Wizard. The second option launches files that have already been created, the third option allows you to import data from other sources and the fourth option launches a dialogue to help you decide which design to use compared to your overall objective and resource.

To set up a new design select the “New Design” option. To the left side of the screen there are a number of drop-down menus (figure 2):
- The default option under the ‘Standard Designs’ menu is for 'Factorial' designs, used for screening and robustness studies. You’ll also see a menu for 'Response Surface' designs, for optimising important factors highlighted by prior knowledge of the process or previous screening experiments. These are used to model curved responses.
- 'Mixture' designs should be used when responses depend on proportions of factors/ingredients, not absolute amounts (e.g. formulations),
- Finally, 'Custom Designs” include Optimal designs for combined Factorial and Mixture investigations, more tailored User-Defined designs, and Historical data analysis options, for previously acquired historical data (Import Data Set) which has not necessarily been acquired using DoE methods.
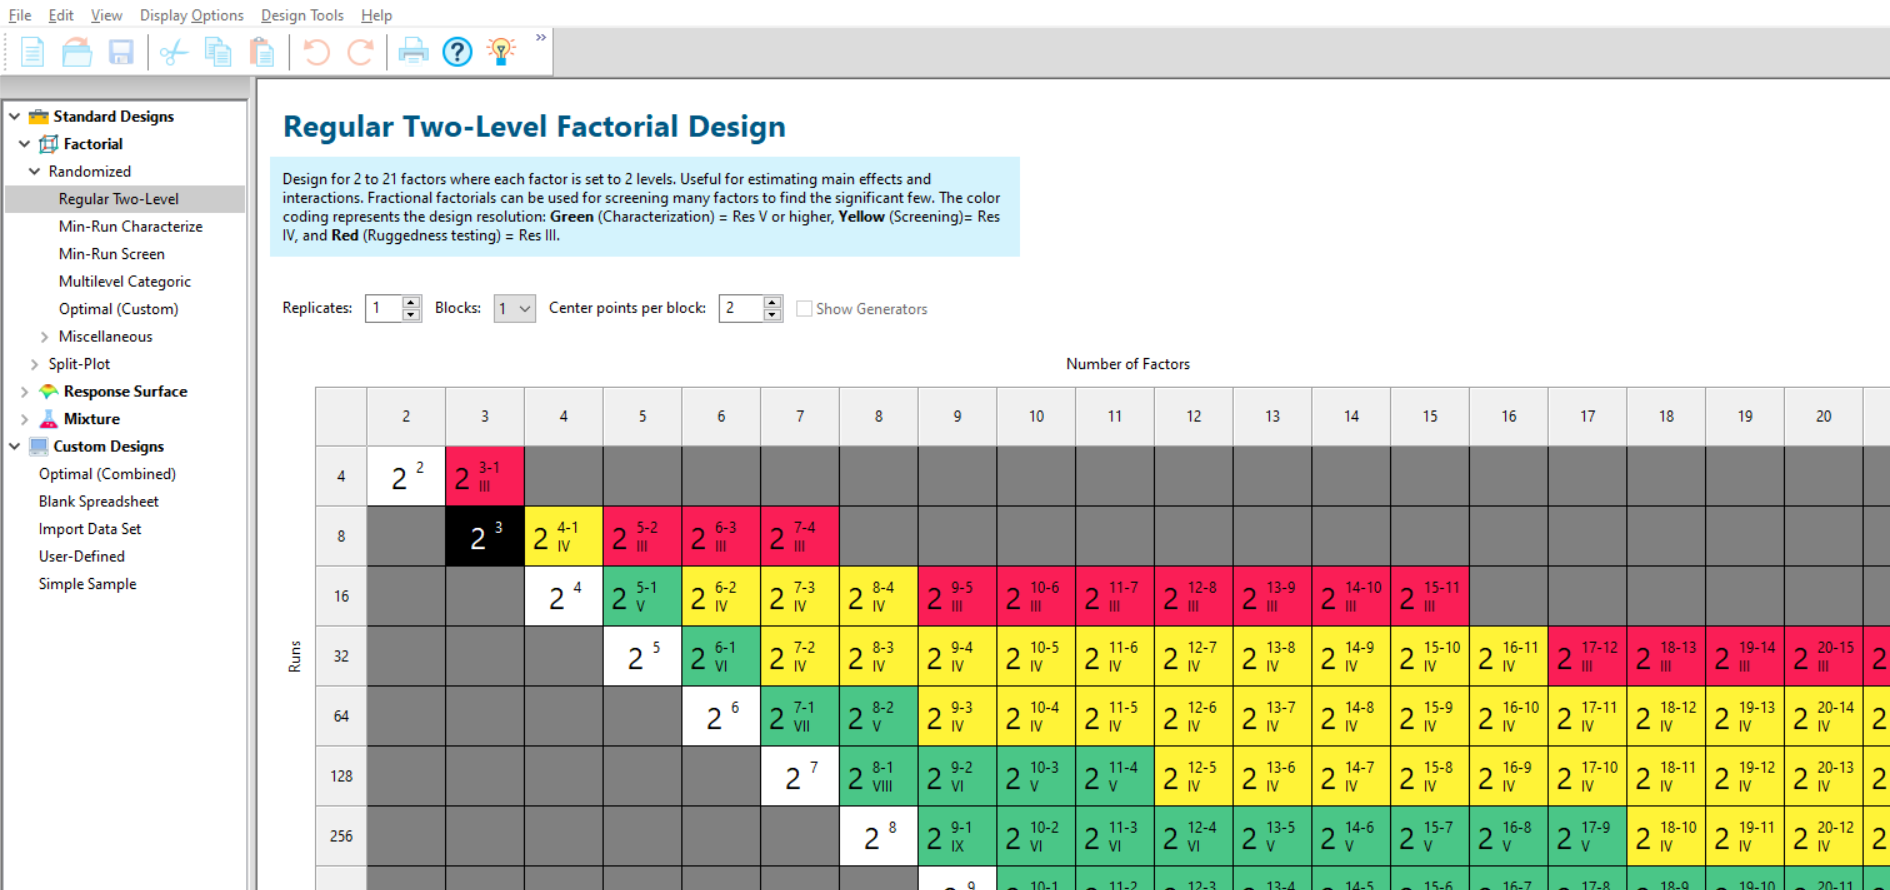
Within the default Factorial tab, you'll be presented with a colour-coded table where the columns relate to the number of factors to investigate, and the rows correspond to the number of experiments required. Depending on how many factors you have, you may have several options in terms of the number of runs – the colour-coding indicates how safe or risky each design will be (stay tuned for a future example on this topic!).
As we have three factors, and we want to perform a full factorial study, we should select the white 23 cell. At the top of the screen are some important options to consider:
The 'Replicates' number refers to the number of times the entire design is replicated; in this example, we'll leave this at 1 (i.e. no replicates) to minimise the number of experiments.
Next to this, you'll find the number of 'Blocks'; change this if you cannot perform your entire study under identical conditions (on the same day, with a single operator, using the same equipment, using a single batch of materials, etc.). If this is not possible, then you can divide the study into smaller blocks - this would allow the design to account for variation between the blocks. In this worked example, leave this as 1 block
Finally, you'll see the option to add 'Centre points per block' to the design. Centre points - aka CPs - are crucial to confirm an assumption of 2-level factorial experiments, which is that there is a linear response to changing each factor setting over the ranges chosen. Performing replicate CPs will provide an estimate of pure error (i.e. an independent estimate of variation), which would otherwise be absent in the case of non-replicated designs. For this example we’ll change CPs from 0 to 2 (doing this will cause Design-Expert to warn us that it would recommend 4-5 CPs, but we'll choose to stick with 2 to keep resource to a minimum).
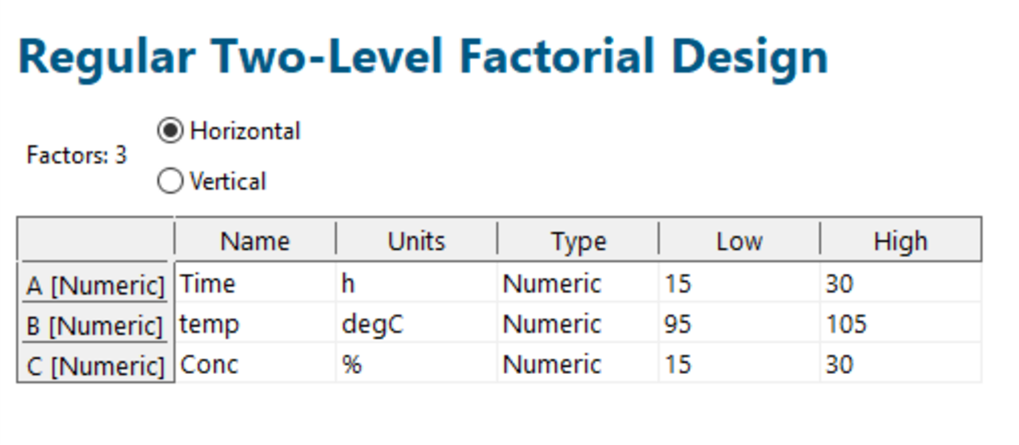
Press ‘Next’ and enter your process factors that will be investigated, and their lowest and highest settings (see figure 3). Note that the orientation of this table can be altered using the vertical option on top of the table; this is to aid pasting directly from spreadsheets so that you don’t need to transpose. The 'Type' column allows Numeric and Categoric variables - if you have a Categoric variable (e.g. Supplier), you can change the relevant 'Type' cell accordingly. In this example, all the factors are Numeric.
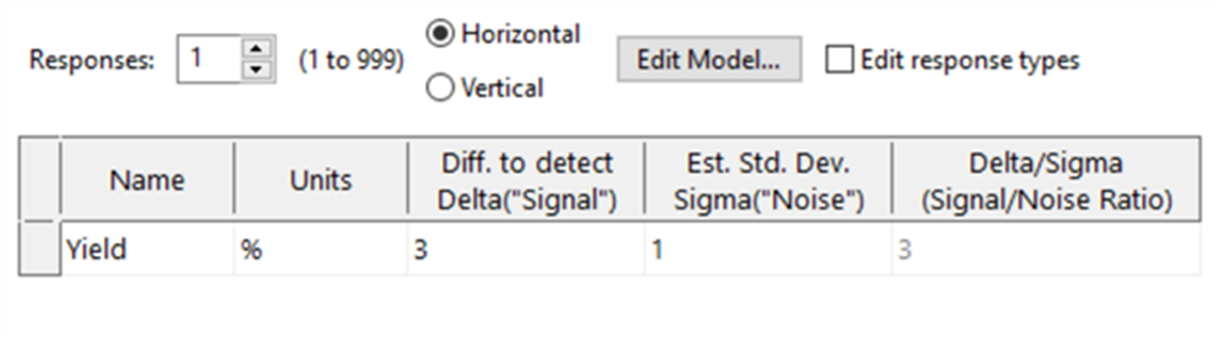
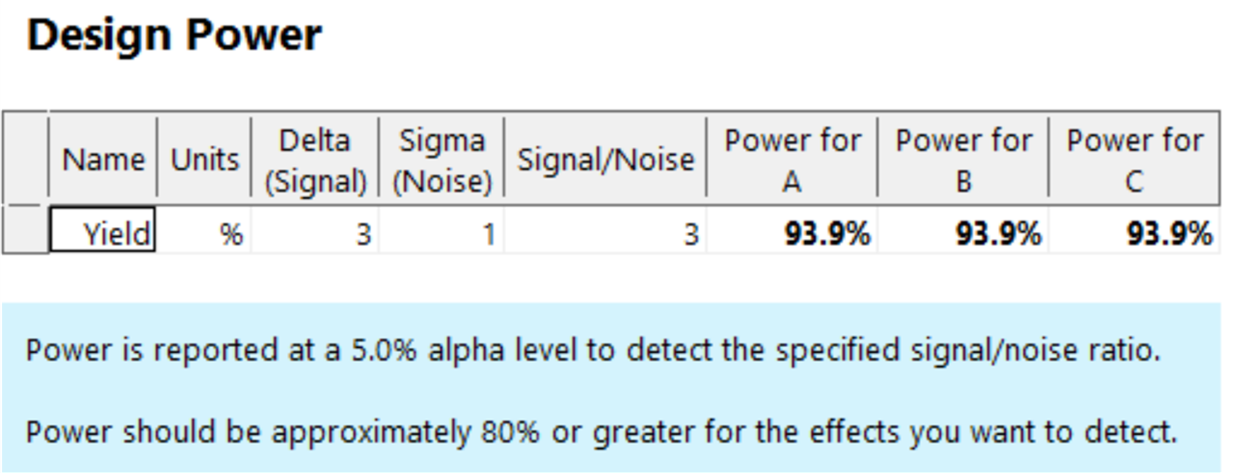
Select ‘Next’ in the bottom right hand corner- now you're ready to enter your responses. You can enter up to 999 responses; to change the number of rows use the drop-down arrow in the number box next to 'Response'. In this experiment there is only a single response (namely, the Yield) so leave this at the default value (see figure 4). If you'd like to calculate the power of the design, enter the 'Signal' as the change in your response that you'd like to detect. We'll change this to '3', meaning that we’d like to observe our Yield changing by 3 times the noise (standard deviation) in response to varying our factors. We also need to enter an estimate for the Standard Deviation of our Yield response – ideally, this would be based on historical data or published literature, but this won't always be possible so you might need to rely on your scientific intuition!
Select ’Next’, and the power calculation will be displayed (see figure 5) - this calculation is based on our specified signal and standard deviation, along with our chosen design and replication scheme. Recommended power is 80% or greater, and in this example the power is comfortably above this – it tells us that our design gives us a ~94% likelihood of detecting factor effects if the Yield change is three times larger than the background noise.
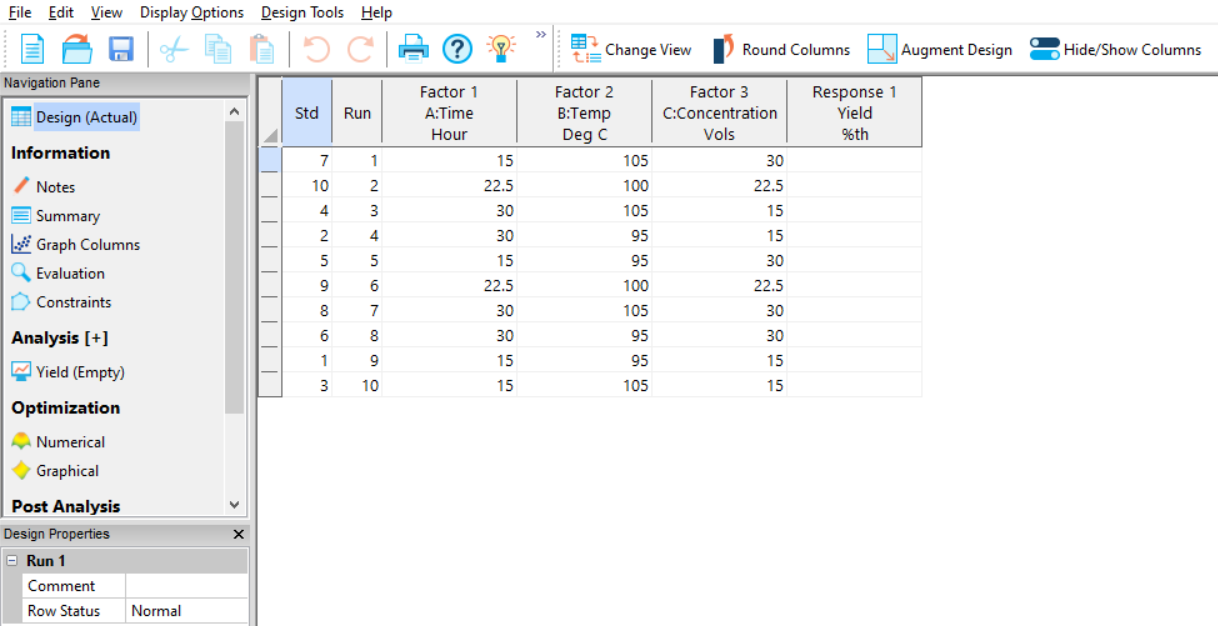
Select 'Finish' to display the design table (see figure 6). Based on the choices we made earlier, our design consists of 10 experiments: 8 design points to estimate the effects of our factors and their interactions, plus 2 centre points to test for curvature and provide an estimate of pure error. You might notice that the order of the experiments looks fairly haphazard – this is entirely intentional, as the design is automatically randomised to minimise the risk of external sources of variation affecting our analysis conclusions.
Congratulations – you’ve now set up your study in Design-Expert, and your next step is to populate the design table by running the specified experiments. After that, the next step will be to analyse the results... which we've covered in the next blog in this series!
If you found this guide useful, or are interested in the wide range of Design of Experiments workshops we offer, please contact us. We'd love to hear from you!
Be the first to know about new blogs, upcoming courses, events, news and offers by joining our mailing list here.